I have been playing with Aurelia.io for about a week, and I’m quite impressed so far. My favorite feature: custom components.
As an example, let’s create a <place-picker> component that shows a map with an autocomplete
field (see Google’s demo).
Create an Aurelia.io site
Ignore this section if you already have an Aurelia site.
If you don’t have Node.js yet, install it from here.
# Create a new directory for your site.
mkdir sample-aurelia-places
cd sample-aurelia-places

# Install all the necessary modules.
npm install -g yo generator-aurelia gulp jspm

# Generate the default site structure. This may take a while.
yo aurelia

# Start serving the site locally.
gulp watch
Create the place-picker component
Now that you have a site, let’s add our custom component. You will need to create two new files:
src/place-picker.htmlsrc/place-picker.js
Since we’re just getting started, let’s make these as simple as possible.
<!-- src/place-picker.html -->

<template>
  <p>
    Hello, World! I'm a place picker.
  </p>
  <p>
    Selected place: ${location.name}
  </p>
</template>
// src/place-picker.js
import {inject, customElement, bindable} from 'aurelia-framework';
@customElement('place-picker')
@inject(Element)
export class PlacePicker {
@bindable location;
constructor(element) {
this.element = element;
}
}Here is what creating these two files does:
- we have defined a custom component
<place-picker> - our custom component takes in a
locationattribute - the HTML template shows
location.name
Use the component
Let’s use the custom component we’ve just created. We need two things:
- something to bind to the location field
- somewhere to include the component
If you have been using the default template, then you already have a welcome component. Let’s
add our place picker in there.
// src/welcome.js

export class Welcome {
  // ...

  homeLocation = {
    'name': 'Eiffel Tower',
    'lat': 48.85837,
    'lng': 2.294481
  };

  // ...
}
<!-- src/welcome.html -->
<require from="./place-picker"></require>
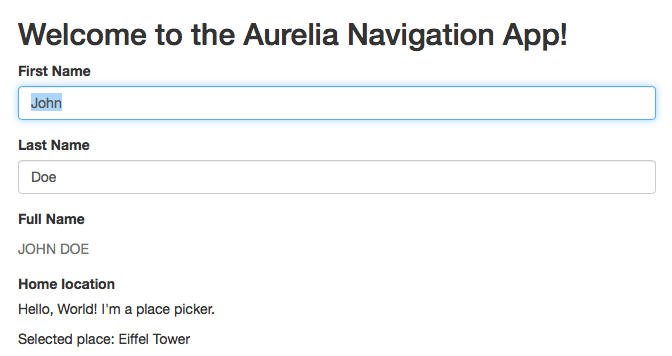
<place-picker location.two-way="homeLocation"></place-picker>Here is what you should see so far:
Display a map with an autocomplete input
Now, let’s make our place picker a bit more complicated by displaying a real map.
First, you’ll need to add a new dependency with JSPM:
jspm install npm:google-maps-apiLet’s update place-picker.html:
<template>
  <input class="place-picker-autocomplete" value.bind="location.name" />
  <div class="place-picker-map"></div>
</template>
We’ll also need to add a bit of CSS to make sure our place picker renders properly:
.place-picker-map {
  height: 300px;
}

.place-picker-autocomplete {
  margin-top: 10px;
  width: 200px;
}
Now, update place-picker.js:
import {inject, customElement, bindable} from 'aurelia-framework';
import mapsapi from 'google-maps-api';

@customElement('place-picker')
// Get an API key from https://developers.google.com/maps/documentation/javascript/get-api-key.
@inject(Element, mapsapi('YOUR_API_KEY_HERE', ['places']))
export class PlacePicker {

  @bindable location;

  constructor(element, mapsApi) {
    this.element = element;
    this.mapsApi = mapsApi;
  }

  attached() {
    // This loads the Google Maps API asynchronously.
    this.mapsApi.then(maps => {
      // Now that it's loaded, add a map to our HTML.
      var mapContainer = this.element.querySelector('.place-picker-map');
      var map = new maps.Map(mapContainer, {
        center: {lat: -33.8688, lng: 151.2195},
        zoom: 13
      });

      // Also convert our input field into a place autocomplete field.
      var input = this.element.querySelector('input');
      var autocomplete = new google.maps.places.Autocomplete(input);
      map.controls[google.maps.ControlPosition.TOP_LEFT].push(input);
      autocomplete.bindTo('bounds', map);

      // Create a marker that will show where the selected place is.
      var marker = new google.maps.Marker({
        map: map,
        anchorPoint: new google.maps.Point(0, -29)
      });

      // Create a lambda that moves the marker and the map viewport.
      let updateMarker = () => {
        var position = new google.maps.LatLng(this.location.lat, this.location.lng);
        map.setCenter(position);
        marker.setPosition(position);
        marker.setVisible(true);
      };

      // Ensure that the current location is shown properly.
      updateMarker();

      // Update the location and its marker every time a new place is selected.
      autocomplete.addListener('place_changed', () => {
        marker.setVisible(false);
        var place = autocomplete.getPlace();
        if (place.geometry) {
          this.location.name = place.name;
          this.location.lat = place.geometry.location.lat();
          this.location.lng = place.geometry.location.lng();
          updateMarker();
        }
      });
    });
  }
}
Don’t forget to add your own API key at the top of the file!
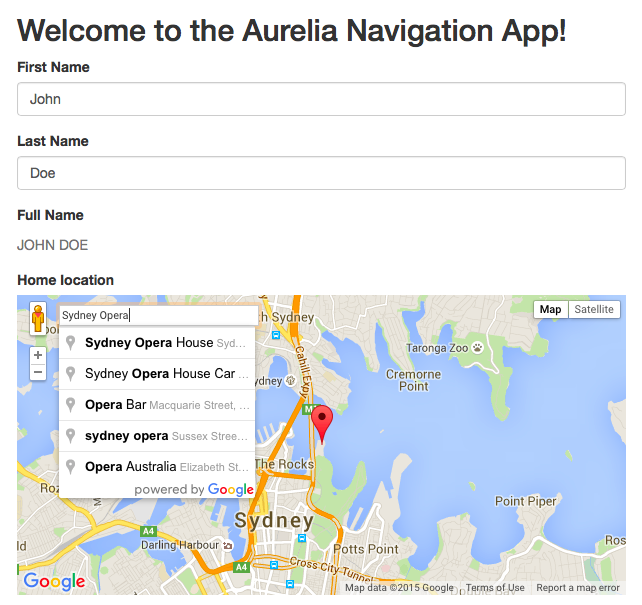
You should now have a fully functional place picker:
That’s it!
Note how our welcome component did not need to change at all when we added more functionality to
our place picker. Separation of concerns for the win! You can play around more, for example by
showing the selected lat/lng in a different part of your UI with
<input value.bind="homeLocation.lat">.
The code for this tutorial is available on GitHub. Let me know your thoughts on Twitter or Facebook!
Disclosure: I currently work at Google. The opinions stated here are my own, not those of my company.